Collecting figures has become increasingly popular, and many enthusiasts enjoy sharing their collections on social media. However, taking high-quality, aesthetically pleasing figure photos is not as easy as it seems. Beginners often encounter problems such as dark images, overexposed reflections, blurred details, cluttered backgrounds, and color inaccuracies. If you’ve struggled with any of these issues, this comprehensive guide will help you achieve professional-level results using just your mobile phone.
This article systematically walks you through the entire process: preparation → phone settings → lighting setup → composition → background & props → post-processing. Whether you use an iPhone, Android, or a basic mobile camera, following these steps will noticeably improve your figure photography.
Let’s break down every step of photographing figures.
Why Photographing Figures Requires Skill
Many people assume that taking photos with a phone is as easy as photographing food, but figures are more akin to miniature product photography due to their material characteristics. Common figure materials include:
- PVC, ABS: Smooth surfaces prone to reflections.
- Resin, GK: Rich in detail but sensitive to lighting, which can create harsh shadows.
- Transparent parts: Effects like hair, weapons, or energy effects can produce glaring highlights if not lit properly.
Key points when photographing figures:
- Control the direction and intensity of light.
- Avoid direct reflections that cause white hotspots.
- Highlight three-dimensionality and detail.
- Ensure accurate color reproduction.
Since mobile phones’ automatic adjustments are not designed for product photography, extra techniques are needed to overcome camera limitations.
Preparing Before Shooting
Proper preparation significantly improves results.
1. Clean the figure: Details matter
Dust, fingerprints, and oil may seem minor to the naked eye, but they become highly visible in close-up shots. Dark hair, shiny clothes, and transparent parts are particularly prone to fingerprints.
Recommended tools:
- Soft brush (makeup brushes work well)
- Air blower
- Slightly damp microfiber cloth (for transparent parts)
Avoid paper towels, which can scratch glossy surfaces.
2. Choose your shooting space
- Natural window light is ideal.
- Avoid direct sunlight; it creates harsh shadows.
- Keep the table clean and background uncluttered.
If shooting at night, artificial lighting will be necessary (see lighting section below).
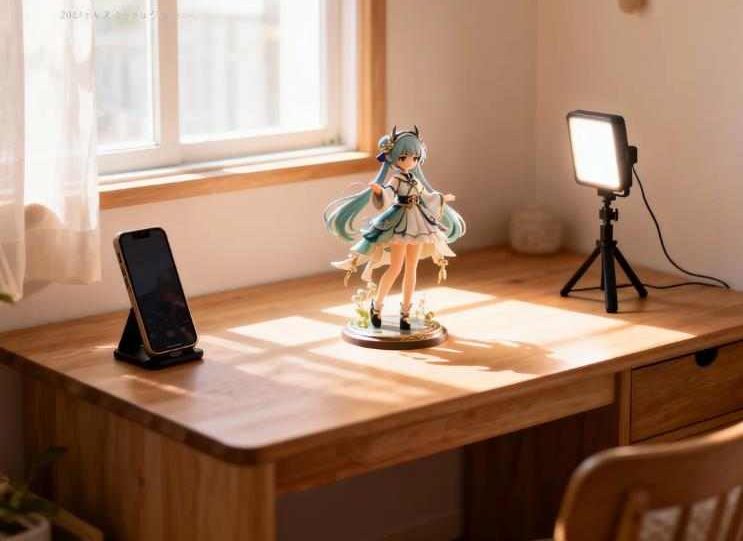
3. Stabilize your phone
Figure photography usually involves low light, causing the shutter speed to drop and increasing blur from hand shake.
Recommended tools:
- Desktop tripod (around $3–10 USD)
- Phone holder
If you don’t have a tripod, rest your phone on a book or other stable surface.
Mobile Photography Settings: Simple Steps for Beginners
The key is to control the photo, rather than letting the phone adjust automatically.
1. Adjust Exposure (EV)
Most phones allow long-pressing the screen to reveal an exposure slider.
- Bright figures: -0.3 to -1 EV
- Dark figures: 0 to +0.3 EV
Lowering exposure slightly preserves details and prevents blown-out highlights.
2. Lock Focus (AF/AE Lock)
Steps:
- Tap the figure’s eyes or face.
- Look for the “AE/AF Lock” indicator.
- Start adjusting composition.
This prevents the camera from refocusing mid-shot.
3. Fix White Balance
Natural light: 4000–5500K (neutral)
Artificial light: Choose “warm” or “cool” based on lamp color temperature
Do not leave it on auto, or colors will vary between shots.
4. HDR Settings
- Portrait-like figure faces: Enable HDR to soften facial layers.
- Transparent parts: Avoid HDR to prevent unnatural color shifts.
Lighting Tools for Figure Photography
Lighting is the factor that improves photo quality the most.
1. Natural Light: Cheapest & Most Effective
Advantages:
- Even and soft lighting
- Accurate colors
- No extra equipment required
Method:
- Place the figure near a window at ~45° angle.
- Avoid direct sunlight.
- Use white paper as a reflector if shadows are too strong.
Natural light enhances the three-dimensional feel of details.
2. Desk Lamps or Ring Lights: Beginner-Friendly
Recommended types:
- White LED, adjustable brightness, color temperature 5000–6500K (daylight)
Setup:
- Place 20–30cm from the figure.
- Point lamp downward to avoid direct glare.
- Use a sheet of white paper or translucent plastic as a diffuser for soft light.
3. RGB Lights or Light Wands: Add Atmosphere
Perfect for creating anime-like moods, night scenes, or action setups.
Uses:
- Backlight blue for nighttime effect
- Side red for tension or danger
- Bottom yellow for magical effects
Tips for beginners:
- Do not shine RGB light directly on the figure
- Use it to enhance atmosphere, not illuminate details
4. Classic Lighting Setups
Single Side Light (Most 3D): Light from the side enhances contours but creates strong shadows; use a reflector to fill shadows.
Two-Light Setup (Key + Fill): Key light illuminates subject; fill light softens shadows. Best for beginners.
Backlight (Dramatic): Place the light behind the figure for rim lighting; perfect for wings, transparent parts, or weapon effects. Use a weak front light to prevent face underexposure.
Composition Techniques: Make Photos Look Like Studio Shots
Good composition is more important than expensive equipment.
- Rule of Thirds: Place eyes or face near grid intersections.
- Leading Lines: Use weapons, flowing ribbons, props, or table edges to guide the viewer’s eye.
- Foreground Elements: Add blurred items like flowers, clear plastic, or small props to create depth.
- Camera Distance: Avoid shooting too close; it can distort proportions. Recommended distance: 20–40cm, then zoom in.
Backgrounds & Props: Elevate Your Photos
A clean background makes the figure stand out.
1. Simple Backgrounds (Budget-Friendly)
- Black cardstock
- Gradient paper
- Fabric cloth
Keep it minimal.
2. Scene Models (Advanced)
- 1/12 scale houses
- Mini streets or cityscapes
- LEGO dioramas
Integrate the figure into a story-like scene.
3. Everyday Items as Backgrounds
- LED string lights (bokeh effect)
- Glass reflections
- Crystal balls for light refractions
Low-cost, high-impact effects.
Post-Processing (Mobile Apps)
Even great shots benefit from editing. Recommended apps:
- Snapseed
- Lightroom Mobile
- VSCO
Workflow:
- Brightness & contrast: Increase brightness, soften contrast.
- Color temperature & tone: Adjust for natural skin tones.
- Clarity & structure: Keep subtle; avoid making the figure look too plastic. Recommended: Clarity +5–20, Structure 0–10
- Spot removal: Clean dust, background distractions, or minor reflections.
- Noise reduction & sharpening: Reduce grain in low-light shots, slightly sharpen details.
Common Mistakes & How to Avoid Them
- Front direct light: Flat, lacks depth → Use side lighting + diffuser
- Cluttered background: Distracts from subject → Use solid color background
- Too close: Distorted proportions → Shoot 20–40cm away, then crop
- Yellow/blue tint: White balance not fixed → Lock white balance + adjust in post
- Mixed light sources (warm + cool): Hard to correct → Use single color temperature light
Recommended Equipment (USD $10–65 Approx.)
Budget ($10 or less):
- Black cardstock, white paper
- Tripod
- Small LED clip light
Mid-Range ($10–33):
- Adjustable color temperature desk lamp
- Mini softbox
- RGB light wand
Advanced ($33–65):
- Aputure or VIJIM mini fill lights
- Adjustable LED panel
- Small scene models
Final Thoughts
Photographing figures is easier than it seems. By mastering lighting, simple composition, and basic post-processing, even the most basic phone can achieve DSLR-level results.
Three key takeaways:
- Lighting is the most important factor.
- Manually adjust exposure and focus on your phone.
- Keep the background simple to highlight the figure.
With patience and step-by-step practice, figure photography can evolve from mere documentation into true artistic creation.