Collecting figures is incredibly relaxing, but many collectors have surely encountered this heartbreaking situation:
You’ve just opened a new figure, yet suddenly notice a small area where the paint has chipped off, worn down, shown white dots, or even peeled off in larger patches along the edges.
So what should you do? Throwing it away is a waste, leaving it as-is is an eyesore, and hiring a professional model painter can cost quite a lot.
The good news is, as long as you use the right methods and tools, even complete beginners with zero modeling experience can repair paint chips themselves.
This guide will explain in the simplest way how to evaluate the damage, choose safe touch-up tools, use different repair techniques depending on the type of paint loss, and prevent future discoloration.
This complete tutorial is suitable for all collectors, especially beginners.
Follow these steps and you’ll be able to repair most paint issues with ease!
一、Why Do Figures Lose Paint? More Reasons Than You Think
Many people assume paint chipping means poor quality, but that’s not always true. Below are the most common reasons—check which one applies to your figure:
1. Tiny paint chips from shipping or impact
The most common type occurs during shipping due to small impacts, leading to white spots or color loss on:
Hair tips
Weapon edges
Heels
Other sharp points
These are easy to repair and don’t affect structure.
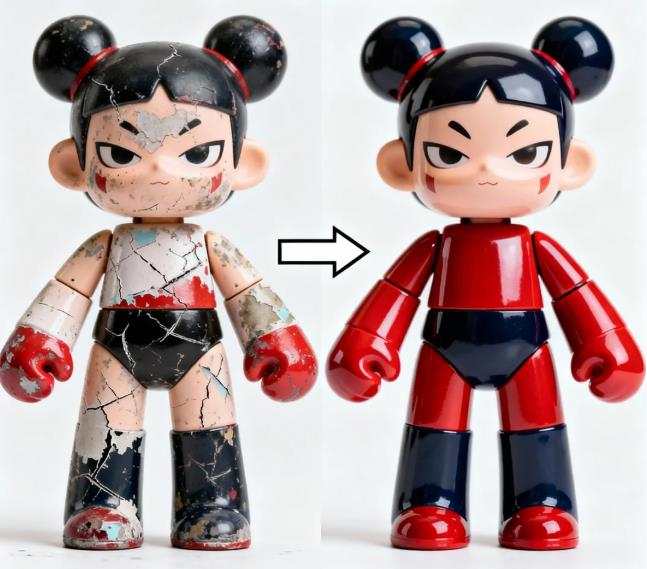
2. Large-area peeling from accidental bumps or drops
If you bump the figure while cleaning the display case or accidentally drop it, the damage is usually worse, exposing white plastic or large peeled areas.
These require more skill and patience to repair.
3. Color fading or whitening due to oxidation—not actual paint loss
Sometimes a figure looks “lighter” or “whiter,” but it’s actually surface oxidation causing a cloudy effect.
This can sometimes be improved using clear coat, without needing a repaint.
4. Sticky figure syndrome causing paint to peel
PVC exposed to humidity or heat releases oil, causing a sticky surface.
This stickiness attracts dust and can even pull paint off, causing patchy damage.
You must remove all oil before repainting.
5. Factory paint applied too thin, making it easy to wear off
Some manufacturers release figures with naturally fragile paint, especially:
Hair tips
Textured clothing
Fingernails
Metal weapons
Small accessories (ribbons, chains, etc.)
This type wears off naturally and is safe to repaint.
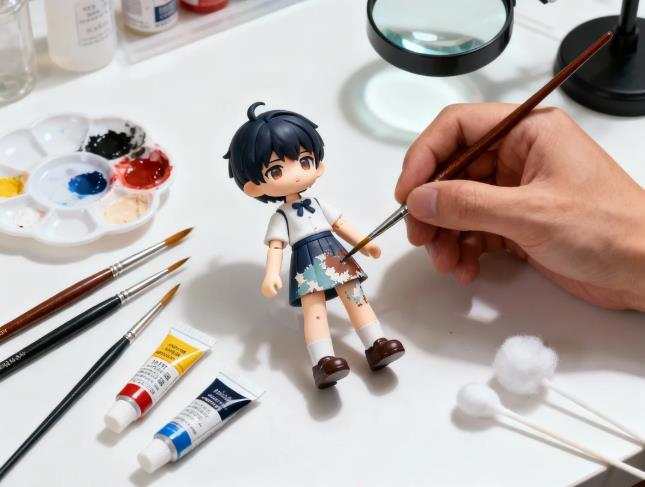
二、Preparation Before Repairing: Tools and Workspace Matter
Choosing the right tools is crucial. Using the wrong materials can ruin your figure, so always use model-safe supplies.
Essential Tools (all easy to buy)
1. Model paint for touch-ups (recommended: GSI, TAMIYA, Mr.COLOR)
✔ Color-stable
✔ Plastic-safe
✔ Long-lasting
Important:
Do not use nail polish, regular acrylic paint, or generic art paint.
These can make the figure sticky, dissolve the surface, or cause melting.
2. Ultra-fine paintbrush (000 or 5/0)
For small-area touch-ups. No need for expensive ones—just thin.
3. Toothpicks or bamboo sticks
Perfect for ultra-precise dot touch-ups.
4. Cotton swabs, makeup pads
For cleaning or correcting mistakes.
5. Thinner
Each paint brand requires its own thinner for proper flow.
6. Clear coat (gloss, semi-gloss, or matte)
Always apply after touch-ups to extend durability.
三、Light Paint Damage: Easiest Repair Methods for Beginners
Perfect for anyone with zero experience. If the paint chip is a dot or small patch, you can fix it in minutes.
Method 1: The Toothpick Dot-Touch Method (simplest & safest)
Best for:
Hair tip paint loss
Small white dots
Light scratches
Steps:
- Gently clean the area with a cotton swab
Removes dust and oils so paint can adhere. - Dip a tiny amount of paint onto a toothpick
Less is more—thin layers are key. - Lightly dot the paint onto the chipped area
Do not draw or brush—just tap. - Wait 5 minutes and apply a second dot if needed
Two layers are usually enough. - Apply clear coat after it dries
A thin layer is sufficient.
Method 2: Ultra-fine brush thin-layer method (for slightly larger areas)
Ideal for:
Faded color
0.5–1 cm worn areas
Face or clothing sections where smoothness is important
Steps:
- Mix and thin the paint
Thinner than normal—milk-like consistency. - Apply an extremely thin first layer
No need for full coverage yet. - After 10 minutes, apply the second layer
Gradually build up opacity. - Finish with matte or gloss clear coat
Helps blend and protect.
四、Medium to Heavy Paint Damage: More Advanced Techniques
For more serious issues such as large peeled areas, exposed plastic, or cracks.
Method 1: Sponge-dabbing technique (best for large surfaces)
Great for:
Legs/arms large surface areas
Clothing, cloaks, or big color patches
Steps:
Dip sponge with small amount of paint
Dab on paper to remove excess
Gently “tap” the figure surface
Repeat 2–5 times until even
Advantage: leaves nearly no brush marks.
Method 2: Using putty to fix dents or cracks
If chipping includes dents or missing chunks:
Steps:
Apply modeling putty
Fill the missing area
Once dry, sand with 1000–2000 grit sandpaper
Repaint normally
Finish with clear coat
Perfect for repairing broken edges.
五、Clear Coat Is Essential! Prevent Future Paint Loss
Without clear coat, newly applied paint may peel again in weeks.
Clear coat helps:
Strengthen the paint layer
Smooth the surface
Prevent oxidation
Enhance gloss or matte effect
Types:
Gloss – great for metal, shoes, eyes
Matte – most common; ideal for clothing and skin
Semi-gloss – for mild shine without over-glossing
Use model-safe acrylic clear coats to avoid plastic damage.
六、How to Prevent Paint Loss? More Important Than Repairing
Many cases are avoidable with proper care.
1. Avoid direct sunlight
UV causes fading and whitening.
2. Don’t store in humid or hot places
Humidity → sticky syndrome
Heat → softening, color bleeding
Ideal humidity: 40–60%
3. Use dust-proof display cases
Dust absorbs oils and makes surfaces sticky.
4. Clean using a soft brush
Never use alcohol or wet wipes.
Alcohol destroys clear coat and dissolves paint.
5. Avoid touching delicate areas
Hold figures by sturdy parts like base, skirt underside, or hair back.
七、Common Q&A About Paint Repair
Q1: Will beginners fail their first repair?
No. Most chips can be fixed easily with the toothpick dot method.
Q2: Which paint should I buy? Can I use regular art paint?
No.
Only model-safe paints avoid plastic corrosion and stickiness.
Q3: What if the repaired area has a color difference?
Apply two thin layers and ensure proper thinning.
Clear coat also helps blend the color.
Q4: How do I treat sticky figures?
Use makeup remover or gentle cleanser first.
After removing all stickiness, start repainting.
Q5: I’m too scared to repaint. Any alternatives?
Yes, many model painters offer small repair services, often cheaper than expected.
But for small chips, you can definitely do it yourself.
Repairing Paint Loss Isn’t Hard—Every Collector Can Do It
Paint chipping is extremely common in figure collecting.
There’s no need to panic or assume your figure is ruined.
With the right tools and simple techniques, you can make chipped areas nearly invisible—or restore the figure completely.
I hope this complete tutorial helps you rescue your beloved collection and display it with confidence.
If you have a difficult paint-loss issue, feel free to describe it or send photos—I can give more customized repair advice!